What it is
As the name implies, claymation involves the use of clay. We use the clay to create characters, scenery and props for a type of video. It is the same principle as drawing a stick figure in the corner of a page on a pad of paper (or a text book) and then on the next page drawing the figure again but in a slightly different position. After you draw enough pictures on enough pages you can flip the pages and watch the character move. Take a look at this example:
In claymation you set up characters in a scene and take a picture of the scene with a digital camera. If a character is supposed to move on the screen you move the character slightly and take another picture. By taking a series of pictures you can create movement on the screen. You have seen examples of claymation in TV programs like Gumby or the old Mr. Bill Show from Saturday Night Live or in the movies such as Chicken Run or The Nightmare Before Christmas. Obviously movie studios have more time and talent available to them than students in a classroom do, so our movies will not look as smooth or be as long. For an example of claymation, again I turn to YouTube:
Much like in video, curriculum standards are selected and students are required to create a movie that allows them to show what they know about the topic. Because this is a time intensive activity, I recommend the use of groups. This will allow for many sets of hands to create characters and scenery. Once the script is written and the characters and scenery have been created production begins. Claymation movies can be created by setting the scene up right and creating three dimensional characters. In this case you would take your pictures head on. Or you can create a flat background with one dimensional characters and shoot looking down on the scene. This video is created by using digital still cameras (not video). Learners take pictures to show movement and to show
action on the screen. Once all the pictures are taken, they are moved to a computer where they are edited together. Pictures are ordered and timing of the pictures adjusted. Adjusting timing is important because some pictures will move quickly to show movement while other pictures will stay up on the screen for a long time while a character talks or something is explained. In order to show movement it is best to use video software, such as the Macintosh iMovie or Window’s Movie Maker. However you can use PowerPoint as well to create a self running slide show that can also be used to create claymation. Just like in digital video, when video is completed it can be saved as a file that can be seen on a computer, such as a Quicktime file (.mov extension and the Macintosh default) or a Windows Media Video (.wmv and the Windows default), be exported to video tape, or, if the computer has a DVD – burner, be written to a standard DVD disc. While it is called claymation it is important to remember that you don’t have to use only clay in the production. It is perfectly fine (and preferable) to bring in other types of props and characters to the production.
How it relates to learning with technology
The reason to use claymation in the classroom is not to create award winning movies (even though they might), but rather to provide the students with another way to show that they have met the curriculum standards. This relates to the issue in Universal Designs for Learning (O’Neill, 2001), Multiple options for expressing knowledge. Another reason for doing a project like claymation is that, as with digital video, it helps us move further to the base of Dale’s Cone of Experience (Dale, 1969) to create direct purposeful activities in an attempt to make learning less abstract and more concrete. And because creating clay figures or other representations of learning content is a way of creating concrete objects out of abstraction it helps to make the experience even more purposeful and direct.
Claymation requires a lot of work before anybody can shoot a single scene. It can be time and resource intensive, so it is best to have learners working in groups. Before anybody touches any clay, research must be done on the topic and scripts must be written. Then characters and scenery need to be created and the production schedule must be set up. Even a short claymation movie of 45 – 120 seconds can require a great deal of planning. Therefore, the creation of a claymation movie means that learners must spend a great deal of time with the content as they plan the movie, as they create the movie, and as they edit the movie for final distribution. Learning by creating claymation may be more constructivist in nature than learning from a other types of media. By this I mean that when creating the final product everybody will learn something, but
everybody may not learn the same thing. Claymation production moves further down the Cone of Experience (Dale, 1969) to enactive. But it is also a great way to manifest the theory of Multiple Intelligences (Gardner, 1993). Clay is tactile, to be sure, so it helps provide an outlet for kinesthetic learning, and as you move the scenes together and try and match them to the audio it requires both visual-spatial learning and logical-mathematical skills. As you do claymation yourself you will likely see other ways that Multiple Intelligences can be manifested in this type of learning with technology. Because claymation can take a long time to do, it is best to use it with projects where you can meet multiple curriculum standards from multiple curriculum areas.
General Technical Issues
1. The type of digital camera does not matter very much. At Winthrop University we have used older Sony Digital Mavica cameras that use floppy disks. Resolution of 640x480 is fine for claymation. Higher resolutions and the use of better cameras will improve quality, but the older cameras work fine.
2. Full motion, smooth, video is 30 frames per second. So if you wanted smooth movement of an object moving across the screen for 5 seconds you would have to set up and take 150 pictures. That is studio quality, but not classroom practical. While it is important to show motion, your motion can be quite choppy. Clunky animation is one of the things that makes claymation visually interesting.
3. Use a tripod to hold the camera still. Typically you set up the camera and focus on the background and then move the characters and backgrounds, not the camera. When you zoom in to set up the camera leave yourself a couple inches all around your border. The camera may not focus as tightly as you think it shows. Students will be disappointed to see a piece of table in their movie.
4.
Characters should be light weight, so don’t
make them entirely out of clay. Use
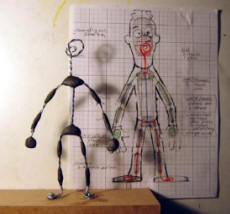 Styrofoam balls for a character’s
head and shape thin aluminum foil to create the body and then cover it
with clay. This will save time and clay.
Styrofoam balls for a character’s
head and shape thin aluminum foil to create the body and then cover it
with clay. This will save time and clay.
5. If a character has to move across the stage, put the character on a strip of paper and use the paper to slide the character across the stage. (This technique was developed by a group or 5th graders. I learned it from watching 5th graders do claymation movies.) The more you touch the character the sooner it will fall apart.
6. You will want to do audio narration of the movie. It is often easier to lay the audio down (as we say in show biz) first and then set the timing of your pictures to match the audio.
7.
Think of different ways to show movement. If
you have clouds on the background don’t glue them all down. Use double
sided tape and move them as you take pictures. If you have a sun in the
background, use strips of colored paper or clay to show the sun beam
shining.
General Class Management Issues
1. Have room to spread out. When you set up tripods and there are many people walking around the room it is easy to accidentally move a camera in a crowded space.
2.
Use non-hardening modeling clay. Play-Doh
dries quickly making it inappropriate for use in claymation.
Non-hardening clay will allow you to spread the project out over time
and not worry about the characters falling apart. Non hardening clay can
have a high oil content that may stain hands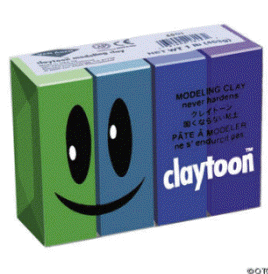 (temporarily) and tables
and clothes (sometimes permanently), so prepare accordingly.
(temporarily) and tables
and clothes (sometimes permanently), so prepare accordingly.
3. Try and keep the scale of the projects small, both in terms of time and physical size. A claymation movie in a classroom should not be longer than 2 minutes (120 seconds) unless you have a remarkable amount of time to spend on it. Additionally it should have a physical scale of about the size of a shoe box unless you have a remarkable amount of storage space in your classroom.
4. This is a very active activity. Prepare for noise and lots of it. Plan ahead to have parent volunteers to help you manage the environment.
5. Set a schedule and stick to it. Students will want beautiful production values, but remember their goal is to create physical manifestations of what they know. So it is ok if their cow looks like a pig or if you can see the wire moving the bird across the screen. You can help teach them time management by giving them a finite number of class periods for research, character creation, picture shooting, and editing.
6. As with video, make this a multiple curriculum standard activity. It is possible to do something like this that can be very time intensive providing that you can justify it as an activity that can meet many curriculum standards.
Some Examples
Below are some examples of Claymation made by students I have worked with:
Handouts and Tutorials
Window's Movie Maker for Digital Video by Dr. Marshall G. Jones
PowerPoint for Digital Story Telling by Dr. Marshall G. Jones
Useful Links for how to do Claymation and Claymation Products
The Clay Animation Station
http://library.thinkquest.org/22316/home.htmlInstructables: Claymation!
http://www.instructables.com/id/Claymation!/Tech4Learning's Clay Animation Kit
http://www.tech4learning.com/claykit
References
Dale, E. (1969). Audio-visual methods in teaching. New York: Dryden.
O’Neill, L. M. (2001). Universal designs for learning: Making education accessible to all learners. Syllabus. April, (pp. 31-32).
Gardner, H. (1993) Multiple intelligences: the theory in practice - a reader. New York: Basic Books.
PAL Home | Podcasting | Video | Digital Story Telling | PowerPoint | Claymation
First posted
10/01/2008. Original material copyright Marshall G. Jones, Winthrop
University, 2008.
Use with permission of the author.
http://coe.winthrop.edu/jonesmg/lti/pal