Eclipse CDT Tutorial
Eclipse CDT Homepage: http://www.eclipse.org/cdt/
Tutorial written by: James D’Aniello
Hello and welcome to the Eclipse CDT Tutorial. This tutorial will teach you the basics of the Eclipse IDE’s C/C++ Development Tools (CDT). First off, some terminology:
· Eclipse CDT – The Eclipse C/C++ Development Tools. A plug-in to the Eclipse Classic IDE that allows the use of the C and C++ programming languages, compilers, debuggers and more.
· IDE (Integrated Development Environment) – A software application that provides a set of comprehensive tools for software development.
This tutorial will assume you already have downloaded and installed Eclipse CDT or Eclipse Classic plus the CDT Plug-in. If you don’t already have it, here is a somewhat outdated guide to setting it up for Linux/Unix, Windows, and Mac OS X: http://max.berger.name/howto/cdt/cdt.jsp
The basics hold true, but many of the software mentioned in the article have newer versions available such as Eclipse Indigo and the combined MinGW/MSYS installer for Windows.
Table of Contents
· Making Your First Project in Eclipse
· Command Line Arguments in Eclipse
· Managing Multiple Files in Eclipse
· Syntax Made Easier in Eclipse
· Making Eclipse Your Own
· Beyond This Tutorial
· License
Making Your First Project in Eclipse
1. Open up Eclipse (by either typing “eclipse” in a terminal window or going to the Applications tab at the top, select Programming then select Eclipse).
2. Set up your workspace
a. Your workspace is where your projects will be saved. I advise making a new folder for your workspace because it will place many files and folders in this destination.
3. Close the welcome tab (if you have one)
4. Go to Window → Open Perspective → Other
5. Click on C/C++ and click OK
6. Now go to File → New → C++ Project
7. Name your project “HelloWorld”.
a. Under “Project Type”, open the “Executable” Folder and click on “Hello World C++ Project” and make sure that the correct Toolchain is highlighted on the right.
b. For Windows, that would be either MinGW GCC or Cygwin GCC. Linux GCC for Linux, and MacOSX GCC for Mac.
c. Press Next
8. Enter any information you want into the Author, Copyright, Hello World Greeting, and Source fields (it is OK to leave values as they are).
9. Press Next
10. Make sure Debug AND Release are checked, then click Finish
11. Now you will see your source code appear in the middle window like the picture below
a. if you don't see the code in the middle window, under the Project Explorer tab on the left, double click on HelloWorld and then double click on src, then double click on HelloWorld.cpp.
12. But before you can run your program, you must build it for the first time.
13. Go to Project → Build All. You don’t want to do this every time though, so after it is built, make sure Project → Build Automatically is checked.
14. Now it’s time to run your program. Go to Run → Run. (If it asks you what to run, select “Release”). (I have had problems with Run not appearing under the Run tab on the first try; move the cursor someplace else and come back to the Run tab and you should see Run now). Alternatively, you could use Ctrl+F11 to do the same.
15. Your program will run and output to the console at the bottom of your screen like so:
16. Say you wanted to change some of your code. Use your mouse and keyboard to change “!!!Hello World!!!” to “Hello Eclipse!”.
17. Whenever you change something, it is always a good idea to save it. Go to File → Save to save your work. However, if you are going to run the program after changing something, it will ask you if you would like to save your changes.
18. Because we already checked “Build Automatically”, we can simply go to Run → Run and it will build and run our program. If you have not saved your changes, it will also ask you if you would like to save your changes.
19. Now the console shows this:
20. Congratulations! You’ve successfully built and ran your first program in Eclipse CDT.
Command Line Arguments in Eclipse (if using argv and argc in your C++ program)
1. I want to briefly cover command line arguments in Eclipse because they are different compared to just typing “HelloWorld argument1 argument2” into a terminal.
2. Go to Run → Run Configurations…
3. Click on the tab that says “Arguments”
4. Enter your command line arguments in the box labeled “Program arguments:”
5. Press “Run”.
6. Since the HelloWorld program does not use argv and argc, doing this will have no effect.
Managing Multiple Files in Eclipse
1. What if you want to add a data file to your program?
2.
Go
to your program’s folder in the Project Explorer:
3. And right-click on the folder HelloWorld and go to New → File.
4. Call it “datafile.txt”
a. Now you will have an empty file in the middle of your screen that you can input data to be used if your program reads from a file
5. If you would like to create a header file, you can right click on your program’s folder in the Project Explorer and go to New → Header File.
6. Call your header file “HelloHeader.h”. Notice that Eclipse automatically generates your header file with the following statements where you can insert your code:
7. Also, now you can switch between your source and data files by simply clicking on their tabs.
Syntax Made Easier in Eclipse
1. Another wonderful feature of Eclipse is the syntax highlighting. This feature comes standard in many, many text editors as well, so how is syntax made easier in Eclipse?
2. Eclipse dynamically checks for errors without compiling and just like your favorite word processor, will underline errors and provide suggestions on how to fix them.
3. Take the following code for example: (note, while typing this code, Eclipse assists you by inserting various characters that it is certain you will use. Watch the screen while typing.)
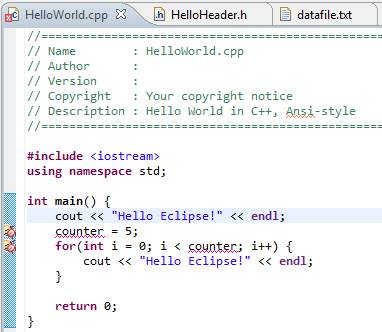
4. Eclipse is letting me know that there is an error through multiple signals.
1) The tab for “HelloWorld.cpp” has an ‘x’ in the left area of the tab.
2) The variable “counter” is underlined in red
3) There is an image of a X on the lines with the errors
5. I failed to declare the variable “counter”, and Eclipse knows this and will give me suggestions on how to fix this error before I compile it. Click on the X image, and Eclipse will give you suggestions on how to fix it:
6. Eclipse also has a spellchecker that works in comments
Making Eclipse Your Own
1. First off, there are many more tools within Eclipse that were not covered within this tutorial.
2. However, one useful and time-saving option is the keyboard shortcuts menu.
3. Go to Window → Preferences
4. Open the “General” folder and then click on “Keys”
5. From here you can change the keyboard shortcut scheme to that of either Microsoft Visual Studio or Emacs, or you may bind your own keyboard shortcuts.
6. While in the “Preferences” window, you can open up the “C/C++” folder and click on “Code Style”.
7. The default profile (K&R) puts the opening brace of a function on the same line as the function’s name, however you can change the profile to GNU for the brace to be put on the following line instead. Again, you can also change the formatting however you would like to.
8. You can also tweak any other setting in the Preferences menu to your liking.
Beyond This Tutorial
If you would like to learn more about Eclipse, you can visit the official Eclipse Documentation at: http://www.eclipse.org/documentation/
![]()
Eclipse CDT Tutorial by James D'Aniello is
licensed under a Creative Commons Attribution-ShareAlike 3.0 Unported License.