
So far all our application programs have been very simple. Now let's make a larger application that can answer some useful questions. You will create an application that can draw information from the sales Excel file we previously used. The application will allow the user to determine which regions, reps, or items account for the most sales. The user may want to consider sales in dollars or sales as number of items sold.
We will break this into two portions. First, Part 9, we will build a menu and write some code to handle the simpliest menu functions. Finally, Part 10, we will write code to handle the more complex functions. Part 9 is mostly design work. Part 10 is fairly complex coding.
|
|
| |
| Screen shot of the application when it first starts. | Screen shot of the drop down menu under "Data". |
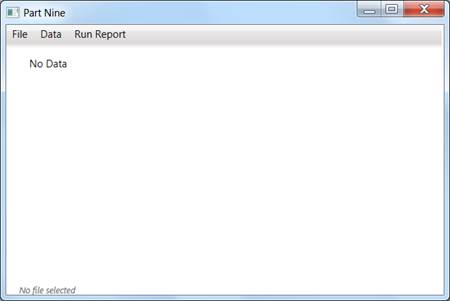
That ribbon across the top with "File - Data - Run Report" is a menu. It is a WPF control. A menu has a lot of parts, so add it to the top of your application, but leave creation of the menu-items and sub-menus until later.
That label with the content "No Data" is actually a really big label that uses most of the application's screen space. It needs to be big because it might contain a single line of data, or many lines of data (see examples below). Be sure to name it so you can change its content in your code. Initially it should just contain "No Data" because the application starts with nothing loaded.
Somewhere on your main window add a small label that indicates the name of the file that is being processed. I put this label at the very bottom. I also changed its font and color.
The File and Data options will popup sub-menus. But Run Report will just execute some code. To make that code writing easier and clearer, name
that third MenuItem something like "RunReport". Also add a function to call when the user clicks this menu item. Visual Studio will help you name
the click function based on the item's name. So, you should end up with something like this:
<MenuItem x:Name="RunReport" Header="Run Report" Click="RunReport_Click"/>
Now lets add two options to the File item. Right click on the File item, and select "Add MenuItem". Do that a second time. Now File should have two items in its submenu. In the XAML window, change the Header for these two items to "Open..." and "Exit".
To make sure you have no bugs so far, run the application. You should be able to click File and have it display its submenu with Open and Exit. Click Exit. It does not exit, but we will fix that very soon.
Now for the difficult part: adding the submenu for the Data item. Those are eight items are Radio Buttons. You can add radio buttons manually inside the XAML window or use a tool found in the properties window. We will use a bit of both.
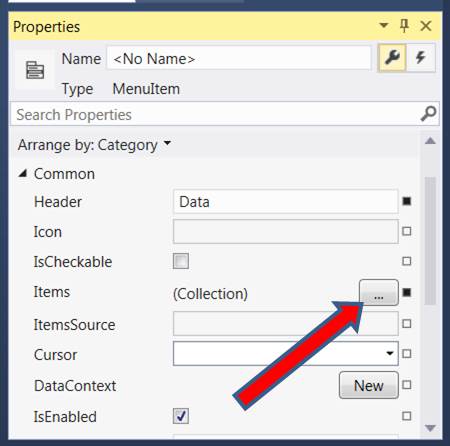
If you left click once on the "Data" item in the main menu, you should see its properties in the lower
right corner of Visual Studio. Under "Common" properties should be
"Items" with a button labeled "...". See figure with red arrow.
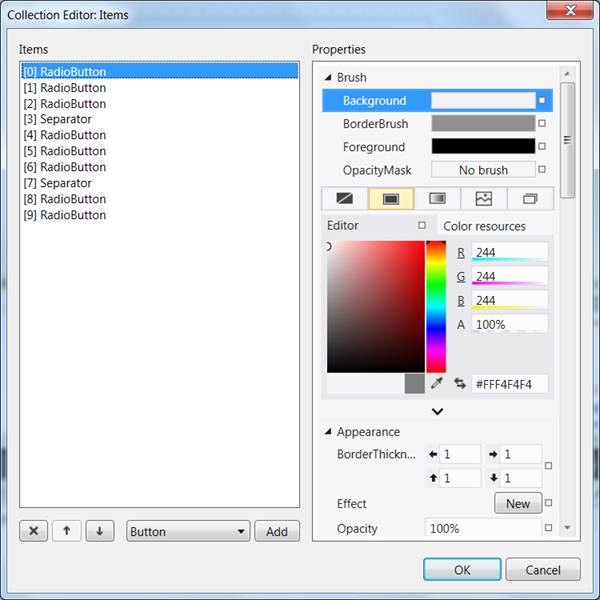
Clicking the ... button will bring up the Collection Editor. See figure below. Use
the collection editor to "Add" the eight radio buttons and two separators. Click ok when done.
Inside the XAML pane, find the code that created the radio buttons. Set each radio button's Content property so that
they are labeled correctly. Three of the radio buttons should start off as already checked, so set the appropriate
buttons' IsChecked property to True. You should have XAML code like this:
<RadioButton Content="Show All" IsChecked="True"/>
Run the application. You will notice that the radio buttons do not work together yet. The user should only be allowed to pick one of "Show All", "Show Highest", or "Show Lowest". The user should also separately be able to select either "Region", "Rep", or "Item". The should only be able to select one of "Units Sold" or "Total Sales".
To get the buttons to work together, we need to group them. Inside the XAML pane, add a "GroupName" property for all eight radio buttons. Give the first three buttons one group name, the middle three buttons another group name, and the last two buttons a third group name.
Run the application again. Now when the user selects "Show Highest" the "Show All" button should automatic uncheck itself.
Let's do the easiest function first. When the user selects File - Exit, then the program should exit.
Double click on Exit and you should go to the C# code window and have a new empty function that is called when the user selects Exit. Here is the one and only line for that function: Application.Current.Shutdown();
Run the application to see if it works.
That's enough for now. We have a function that can select a data file and allow the user to select which data they want to see. All we have to do now is right code for "Run Report". But that is Part Ten.
You will write code to process the variety of options the user might select from Part Nine. The user might want to find the Rep whose sold the highest dollar amount. The user might want to know which item sold the most units. Which item sold the fewest units? How many units did each region sell?
 |
 |
|
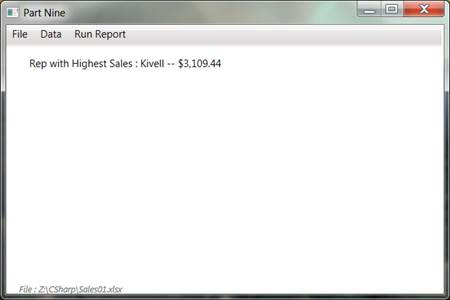
| Sample Output after selecting Show Highest, Rep, and Total Sales |
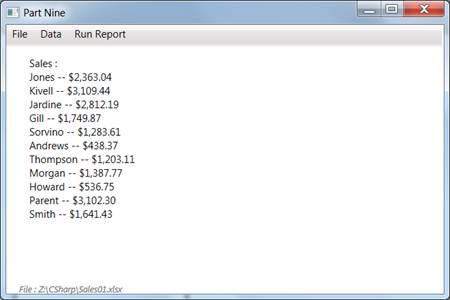
Sample Output after selecting Show All, Rep, and Total Sales |
Before we start writing the code for Run Report, we need to clean up some code from Part Nine. We need to have C# connect to Excel, but we
don't want that to happen every time the user hits Run Report.
We only want code like this
MyApp = new Excel.Application();
to happen once.
Instead of inside Run Report, a better place to put such code would be inside the Open click handler. The user will likely use Open once, then hit Run Report over and over.
Since both Run Report and Open need access to variables such as MyApp, MySheet, etc., declare them as part of the class, not inside one particular function.
Run your application to make sure it does not crash.
In part nine we grouped the buttons so they would work together. But how will Run Report know which three buttons were selected?
We need to name each radio button so we can write C# code to check if they are clicked.
After you name your radio buttons you should have XAML code like this:
                <RadioButton x:Name="radbut_Sums"    GroupName="funct" Content="Show All" IsChecked="True"/>
                <RadioButton x:Name="radbut_Highest" GroupName="funct" Content="Show Highest"/>
                <RadioButton x:Name="radbut_Lowest"  GroupName="funct" Content="Show Lowest"/>
Run it again to make sure nothing broke.
The function that runs the report has a lot of work to do. The first thing it must do is determine which buttons were pressed. We can determine which buttons were selected by inspecting their IsChecked property. Here is some debugging code to try inside the Run Report function.
            if (radbut_Sums.IsChecked == true)
                MessageBox.Show("User selected Show All");
            else if (radbut_Highest.IsChecked == true)
                MessageBox.Show("User selected Show Highest");
            else
                MessageBox.Show("User selected Show Lowest");
So now when we run the program and hit Run Report a message box should appear indicating which option was selected.
Write code to handle all the combinations of options.
Start with the simplest options. You already have code from Part Eight to find the total sales and total number of items sold. So, when the user selects "Show Highest", "Item", "Units Sold" run your old code.
Show Lowest is just a slight variation on your old code.
You should be able to figure out Show All and all the other options.